
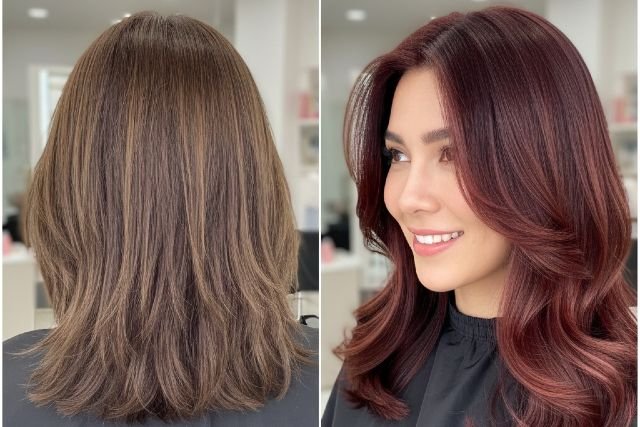
If you’re here for darhergao hair dye before & after proof, you’re not alone. This product has been popping up across e-commerce listings and beauty searches, mostly described as a shampoo-style, at-home hair coloring option that promises faster application and a gentler feel than many traditional box dyes.
But “real results” don’t mean everyone gets the same outcome.
Your before (hair porosity, gray percentage, previous dye, damage level, and natural base color) is what decides your after: whether you see a subtle refresh, an even all-over tone, or dramatic gray coverage. And if you’ve ever been burned by a too-dark dye or patchy application, you already know the truth: the best before-and-after transformations come from expectations + technique, not hype.
In this guide, you’ll see what realistic Darhergao hair dye before-and-after results typically look like, what impacts longevity, how to apply it for the most even color, and how to avoid the most common mistakes — plus safety essentials you should never skip.
What Is Darhergao Hair Dye?
darhergao hair dyeDarhergao hair dye is most often described online as a shampoo-based coloring product designed for home use — typically marketed around convenience (massage in, wait, rinse) and a more “hair-friendly” experience than traditional permanent dyes.
One important note: many mentions of Darhergao appear in trend-style guides and secondary sites rather than a clearly established official brand hub, which means you should be extra careful about verifying the exact product you’re buying (ingredients, directions, and safety warnings on the label).
Darhergao Hair Dye Before & After: What “Real Results” Usually Mean
Let’s define “real results” in a way that matches how hair color actually behaves.
With many non-permanent or lower-processing color formats, the most common before-and-after wins are:
- A noticeable tone shift (especially on lighter or porous hair)
- Smoother-looking hair texture and shine (often from conditioning agents)
- Gray blending rather than 100% opaque “box-dye” coverage (varies heavily by gray type and percentage)
That lines up with how deposit-only color generally works: pigment coats or lightly penetrates the outer hair structure and fades with washing, rather than permanently changing melanin like classic oxidative permanent dyes.
Quick featured-snippet definition
Before & after results with darhergao hair dye typically refer to changes in tone, gray blending/coverage, shine, and evenness immediately after rinsing, plus how that color holds up over the next several washes.
5 “Before” Factors That Decide Your “After”
1) Gray percentage and gray type
Not all gray hair behaves the same. Some people have softer, more porous grays that grab pigment fast. Others have resistant “glass” grays that repel color and need longer processing time or repeated applications.
2) Hair porosity (the hidden deal-breaker)
High porosity hair (often bleached, sun-damaged, or heat-damaged) soaks up pigment quickly — sometimes unevenly—then can fade faster. Lower porosity hair resists absorbing pigment, so results may look subtler but can wear more evenly.
3) Your starting base color
Most deposit-only or gentler dye formats cannot lighten hair. They mainly deepen, tone, or shift your shade. If your hair is very dark, dramatic changes usually require pre-lightening (which is a separate chemical process).
4) Old dye and mineral buildup
Previous permanent dye, henna, hard-water minerals, or heavy silicone buildup can cause patchiness. A clarifying wash (when appropriate for your hair) can make results more predictable.
5) Application technique
The most dramatic before-and-after photos online typically come from:
- Saturating thoroughly
- Working in sections
- Allowing full processing time
- Rinsing correctly and caring properly afterward
Realistic Before & After Scenarios (What You Can Expect)
These examples are “real-world realistic” — the kinds of results many people aim for when using easy-application color products.
Scenario A: Dark brown hair with 10–20% scattered grays
Before: dark base, silver strands around temples
After: overall shade looks richer; grays often look like soft highlights or muted strands rather than bright silver. The biggest visible change is usually shine + tone uniformity.
Scenario B: Medium brown hair with 30–50% grays
Before: mixed salt-and-pepper, noticeable contrast
After: depending on processing time, you may see partial gray coverage or strong blending. Some grays may remain slightly lighter, creating a natural “dimension” effect instead of a flat single tone.
Scenario C: Light brown/dark blonde with warmth/brass
Before: brassy tone, uneven warmth
After: a deposit-style color can neutralize brass and make hair look more polished. Tonal improvement can be more obvious than “going darker.”
Scenario D: Previously bleached hair (high porosity)
Before: uneven fade, porous ends
After: color can grab quickly — sometimes too quickly on the ends — so you may get a darker or more saturated finish where hair is most damaged. This is the category where technique matters most (timing + section control).
How Long Do Darhergao Hair Dye Results Last?
Longevity depends on formula type and your routine, but for deposit-style / semi-permanent behavior, a common fade window is about 4–12 washes (some people get longer, especially with gentler shampoos).
What makes it fade faster:
- Clarifying or anti-dandruff shampoos
- Frequent washing
- Hot water rinses
- High porosity damage
- Daily heat styling without protection
What helps it last longer:
- Sulfate-free or color-safe shampoo
- Cooler rinses
- Washing 2–3x/week instead of daily (if your scalp allows)
- Heat protectant + lower heat settings
Darhergao Hair Dye Application Tips for Better Before & After Photos
If you want a before-and-after that looks “wow” in real life (not just in marketing), treat application like a mini salon service.
Step-by-step: even color method (featured snippet style)
- Start with dry or slightly damp hair depending on the label instructions (follow the product directions exactly).
- Put on gloves and protect your hairline with a thin layer of petroleum jelly.
- Divide hair into 4 sections (two front, two back).
- Apply generously at the roots first (especially where grays are concentrated).
- Pull through mid-lengths and ends last, unless your ends are more resistant.
- Massage thoroughly to avoid patchiness—think “shampoo lather,” but slower and more deliberate.
- Process for the full recommended time.
- Rinse until water runs mostly clear; condition if instructed.
Pro tip: For resistant grays, the biggest mistake is under-saturating the roots. Gray hair needs product contact — lots of it.
Why Some “After” Results Look Patchy (and How to Fix It)
Patchiness usually comes from one of these:
- Not enough product (especially at roots)
- Rushing (not working in sections)
- Uneven porosity (ends grabbing darker)
- Product buildup blocking pigment
- Rinsing too early
If it’s patchy after the first try, don’t panic. Deposit-type color can often be improved with a second application (or a targeted re-do on lighter areas) as long as your scalp feels healthy and you’re following safety guidance.
Shade Selection: How to Pick a Color That Looks Natural
A clean, believable before-and-after usually follows one rule:
Choose a shade close to your natural base or one level darker.
Going too dark is the #1 “regret” route because it can look flat, harsh around the face, and harder to fade out evenly.
If you’re covering grays, choosing a shade too dark can also make any remaining lighter grays stand out more.
Safety First: Patch Testing Isn’t Optional
Hair dye reactions can be serious, especially with ingredients like p-phenylenediamine (PPD) in many darker dye systems. The U.S. FDA specifically advises doing a patch test every time before using hair dye products and notes that PPD is a common allergen.
Dermatology guidance also emphasizes that reactions may occur on the scalp/face/ears and that even a negative test doesn’t guarantee you’ll never react in the future.
For context, published dermatology reviews estimate PPD allergy prevalence in the general population around 0%–1.5%, and higher among people who undergo patch testing (because they already suspect dermatitis).
If you should avoid dye and talk to a clinician
- History of severe eczema/contact dermatitis to cosmetics
- Previous hair dye reaction (itching, swelling, blistering)
- Facial swelling after coloring
- Eye/eyelid irritation after dyeing
Aftercare That Makes the “After” Last
Your aftercare routine is what locks in the before-and-after payoff.
24–48 hours after coloring
If possible, avoid harsh shampoos right away. Many colorists recommend letting color settle before doing heavy cleansing (follow label directions, but don’t “strip-wash” immediately unless instructed).
Weekly routine that preserves tone
- Use color-safe shampoo
- Condition every wash
- Add a deep-conditioning mask once a week if hair is dry
- Reduce hot tools or lower the temperature
Common Questions
Does darhergao hair dye cover gray hair?
It can cover or blend gray hair depending on your gray percentage, hair resistance, and how thoroughly you apply at the roots. Many deposit-style products blend grays more naturally rather than producing 100% opaque coverage in one go.
How long does darhergao hair dye last?
A typical deposit/semi-permanent fade window is about 4–12 washes, depending on porosity and shampoo routine.
Will it lighten my hair?
Most gentle, deposit-focused dyes do not lighten. Lightening usually requires peroxide/developer-based chemistry that changes your natural pigment.
Is darhergao hair dye “safe” for sensitive scalps?
“Gentler” doesn’t mean risk-free. Any hair dye can irritate or trigger allergy. Patch testing is strongly recommended, and PPD is a known common allergen in many dye products.
Why did my results turn out darker on the ends?
That’s usually porosity. Ends are often more damaged and absorb pigment faster, creating a darker look. Shorter processing time on ends (or applying ends last) can help next time.
Conclusion: Are Darhergao Hair Dye Before & After Results Worth It?
When darhergao hair dye works well, the before-and-after usually looks like richer tone, better shine, and softer gray blending, especially when you saturate thoroughly and follow strong aftercare. And when it doesn’t look great, the reason is often predictable: resistant grays, uneven porosity, or rushed application.
The most “real” way to judge it is not by perfect internet photos, but by whether it delivers the results you want: a fast refresh, a more even tone, and manageable fade — not necessarily a permanent salon transformation in one wash.
If you want the best shot at a great before-and-after, focus on three things: pick a realistic shade, apply like a pro (sections + saturation), and take safety seriously with patch testing — every single time.


Leave a comment